I have always enjoyed baking bread. My first attempt was a disaster, though. I decided to make homemade bread for Allen, my boyfriend at the time, before he became my husband.
It is a good thing I started early in the day. I followed the directions carefully, proofed the yeast and thought, “Oh yeah, it is bubbling up like it should.” I was using a cookbook with very few photos back then—no internet. I warmed the milk slightly, added butter, flour, salt and was feeling rather good about my skills. Then I started kneading: push down, rotate dough half a turn, fold over, repeat. I kept working and working but it sure felt stiff and unmalleable. After the recommended ten minutes of kneading I was beginning to wonder why ANYONE would ever make homemade bread. The stiff lump I had was anything but appetizing. But I dutifully placed the dough in a bowl and covered it with a towel.
When I started to clean up that I realized I left the beautifully proofed yeast by the sink and forgot to put it in the flour mixture. I threw out the brick of dough I had and started all over. I was able to meet the challenge before Allen arrived.
Making yeast-raised homemade bread is not hard if you remember to put all of the ingredients in, but it does take time. I am a planner, so I don’t mind the waiting because it just provides opportunities to do other things.

GATHER AND MEASURE INGREDIENTS
Make sure you have everything you need, and if you put it all in one spot (mis en place) so you don’t make my mistake and leave a key ingredient on the opposite of the room. Be sure to measure accurately or weight ingredients. Some bread recipes call for all-purpose flour, others for bread flour, or a mix of different flours. That extra protein in bread flour results in a slightly higher rise and firmer structure. Bread flour also has more gluten, and this makes bread a bit denser and chewier. I now keep bread flour on hand because I think it does make a difference for chewy artisan breads, but I still use all-purpose flour for some of my softer breads.
What’s the old adage? “Cooking is an art, but baking is science.” When cooking, you don’t have to be perfectly precise. You can get great results by following your instincts and preferences; tasting and adjusting as you go. However, I do think baking is an exact science. You have to follow the recipe and method precisely or you won’t get good results.
For this reason it is important to measure your flour properly. Try not to dig way down into the flour bag or container and shake and/or pack flour into the measuring cup. You will end up with more flour than needed and that can result in dry, tough, thick, or crumbly results for any kind of baking; even cookies or cake. Gently spoon the flour into the cup and level it off with a knife or your finger. It is even better to weigh the ingredients if you have a scale.
PROOF AND MIX
Start your bread making by activating the yeast. I put the yeast and just a touch of sugar in the bottom of a glass measuring cup or directly into the mixing bowl. Then I run tap water until it is very warm. Check it by running it over the inside of your wrist. It should feel comfortably warm, not hot, and not cool; like checking the temperature of a baby’s bottle. Or you can use an instant read thermometer for a reading between 100 and 110 degrees. Err on the side of too cool rather than too hot. the yeast will be killed off if the liquid is too hot and you will have to start over.


Measure the correct amount of water, pour it over the yeast/sugar and give it a quick stir. Let it sit for about 5-10 minutes or until you see bubbling action. For demonstration purposes, I used a glass measuring cup so you can see the difference in these two photos after about 5 minutes. For some recipes, I put the yeast/sugar and very warm water directly in the bowl of the mixer, then quickly stir. You can still see how it is activated and bubbly.
Since bread dough is affected by humidity, I usually save out 1/2 cup of flour to see if it is really needed. Flour can act like a sponge and absorb moisture from humid air. So, you may not need as much flour in the winter as in the summer, depending on the micro-climate of your kitchen. Of course, that humidity and warmth can also affect the speed of rising, that’s why there is usually a suggested range of time for proofing dough.
ADD FLOUR AND KNEAD


You can tell the dough has enough flour when it starts to clean the bowl. If mixing by hand, keep adding flour until you get the same result. Now is the time to increase the speed of the dough hook and get the mixer to do the kneading until you have a soft cohesive dough. If kneading by hand, put the dough on a very lightly floured surface. Either way, it takes about 10 minutes to get the dough to form a soft, supple dough. Even when I use my standing mixer, I take the dough out for the final few minutes of kneading. It puts me in a Zen state of mind.
When I was teaching my 3 and a half-year-old granddaughter to knead dough, we had great fun. Almost too much fun. We were laughing and talking as the dough moved closer and closer to the edge. As the dough started to droop over the edge and drop off, we both said, “Oops” as she caught it and moved it away from the edge. Good thing she has her grandfather’s quick reflexes.

Push away 
Fold over 
Rotate dough
To knead on the counter, rather than the floor, use a counter or table with enough space and at a level that allows you to extend your arms fully. Lightly flour the surface and place the dough down. Using the heels of your hands, push the dough away from yourself, fold it over on top of itself toward you, and press down. Turn the dough about a quarter of a turn, and repeat. Continue kneading until the dough is “smooth as baby’s bottom”. Test to make sure the dough is ready by lightly pressing the dough in with your thumb. If a dimple remains, keep kneading. If it springs back and fills back up, you are good to go. You can also try the window-pane test. Pull up a bit of the dough and try stretching it apart until you have a thin opaque window that does not break.
FIRST RISE
This is also called fermenting the dough and it allows the yeast to develop enough CO2 to make the dough rise.
Put some cooking oil or spray in your bowl, or use a new clean bowl if your mixing bowl has flour and/or stuck bits of dough in it, and put the dough back in. Turn it over to coat all sides, cover with plastic wrap and set the bowl in a warm place to rise. Now you get to relax for a while or get busy with something else because the first rise takes about hour or hour and a half in a warm environment. Sometimes, when my kitchen is cold, I put the oven on warm (about 200 degrees) for just about two minutes and turn it off. Then I place the dough in the oven with the door closed. Just don’t forget to turn the oven off! Ask me how I know this is important…


PUNCH, PORTION, ROUND, AND SHAPE
When the dough has risen enough, it will have doubled in size. The dimple test will work the opposite way. Poke the dough with your finger and it should stay down instead of springing back up. Then you get to punch (literally) the whole thing down and reform it into a ball.
I just took an online course about artisan bread baking and learned that punching down is “old school”. I was told to fold the dough over and over to release the air. This way you do not destroy all of the bubbles in the dough. I think I will try to remember this for artisan breads. But I will continue to use the punch method for fine textured bread like my Honey Braids or Buttermilk Bread. Whichever method is used, put it back in the bowl to rest and relax the gluten for a few minutes. Then you can get your pans/sheets ready.
Divide and Round the dough: Cut the dough into as many pieces as needed, usually 2 or 3. I use a bench scraper because it cuts lifts the dough readily if somewhat sticky. Rounding the dough helps prepare it for rolling or shaping. Form each piece by smoothing the top and pulling edges around and under to make a ball. Keep pinching the bottom of the dough together as you go. You will need to rotate the dough in your hands and repeat to get surface tension and a smooth top.


Set the pieces aside and prep your pan according to recipe directions. Then shape the dough as directed in the recipe. Many recipes for artisan-type breads suggest slashing the tops of the shaped bread with a sharp knife or razor blade. This controls the expansion, so your bread doesn’t burst open on top every which way. The second rising usually goes faster and is ready in about 30-45 minutes.
Preheat your oven as you get close to the end of the second rising time. The dough will not yet be at full bread height or size. The final rise, called “oven spring”, occurs when it hits the heat in the oven.

Butterhorns ready to bake 
Honey Braid ready to bake 
Zuni Bread ready to bake
BAKE AND COOL
You can smell that wonderful fresh bread aroma quite soon after it is in the oven, but way before it is finished. Bake the bread as long as is indicated; checking it at the beginning of the range of time that is given. Recipes should give indicators about how the bread looks. Generally the crust should be dry and firm, and golden brown or slightly darker. Tap the bottom of the bread (which should be uniformly brown) with your thumb or fingers. You should hear a firm hollow-sounding thump. You can also take the internal temperature with an instant read thermometer is you are not sure. It should read 190 degrees unless it is a really rich bread with eggs, butter or milk; then the thermometer should read 200 degrees.

Unlike batter breads, yeast-raised breads should be removed to a cooling rack as soon as they are done. If you leave baked bread in or on a pan to cool, moisture will condense and create a soggy texture on the bottom.
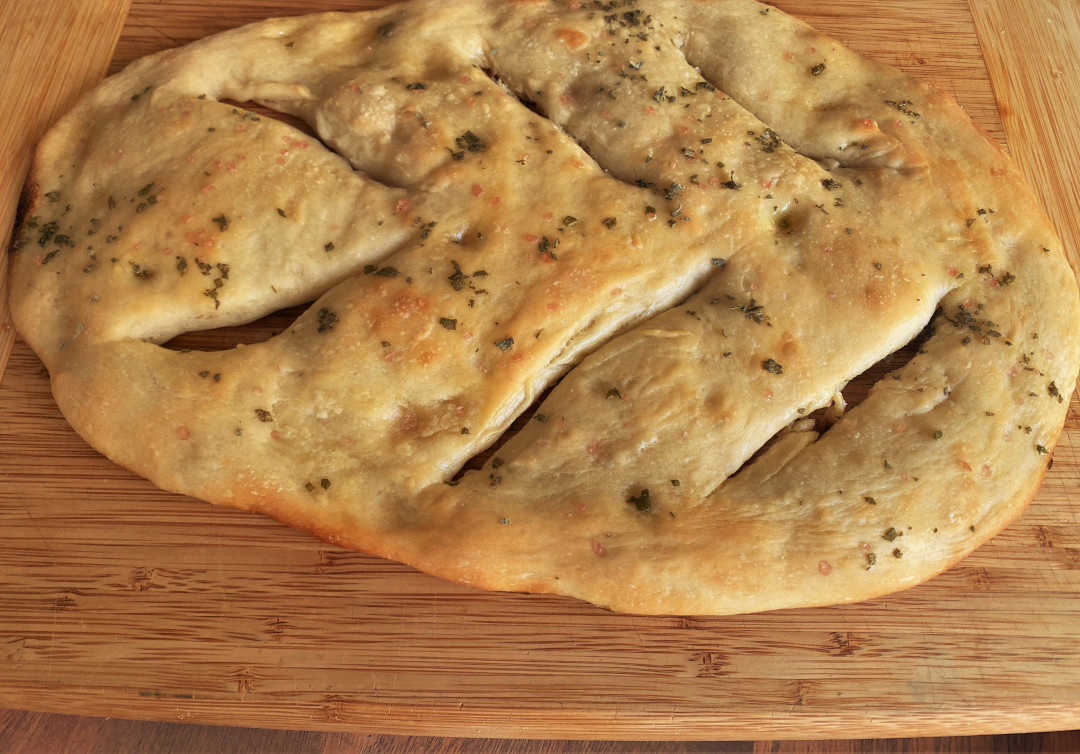
I know it is hard to wait for bread to cool when it looks and smells so good. However, if you try to slice it too soon, you will compress the bread into a slab of mush. I must confess though, that there have been times when my family members have torn off pieces from freshly baked warm flat bread, braided or irregularly shaped bread that doesn’t have to be sliced: like the poppy seed epi bread pictured above or the fougasse pictured below.


I have been eating your wonderul breads for many years and I absolutely
love this recipe. It works I. have made it and it’s just the thing with a nice
Italian dinner: it’s not too sweet : it has salt but not tons. It’s just perfect
to sop up the great tomatoe sauce.! Ina
Thank you, Ina. I hadn’t thought about it, but you are right. The texture of the buttermilk bread makes it a great sponge for sauce or even soup.
Thank you, Ina. Yes, the buttermilk bread is great for sopping up anything, isn’t it? Sauce, soup, gravy…